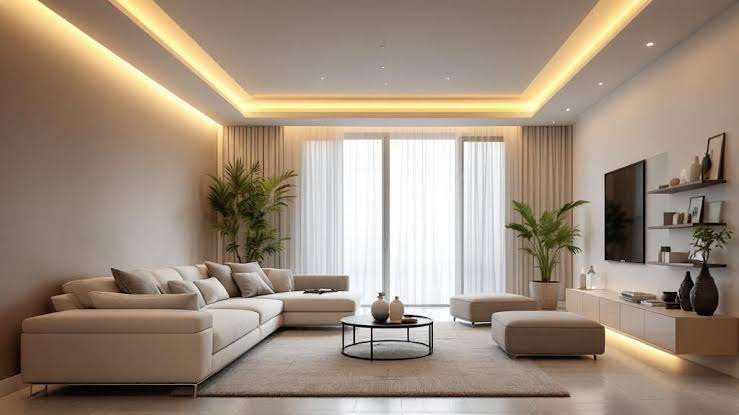
Indirect cove lighting can still give an uneven ceiling a soft, even glow, but only when the cove is designed around the ceiling’s flaws rather than against them. The short answer: follow the ceiling instead of fighting it, keep the light source hidden behind a deep enough lip, and plan driver and dimmer access before anything is sealed up.
Cove lighting hides its source in a ledge, trough, or crown molding near the top of the wall and bounces light off the ceiling. The ceiling becomes the reflector, so every dip and slope shows up in the wash. Uneven ceilings with limited access therefore need geometry that absorbs irregularity, LEDs that forgive a bumpy reflector, and components that stay reachable.
How Indirect Cove Glow Behaves When the Ceiling Is Not Flat
On a flat ceiling, cove light spreads in a smooth gradient, brightest near the cove and fading gently toward the center of the room. On an uneven ceiling that gradient breaks: a low spot catches more light and reads as a bright patch, a high ridge throws a shadow line, and a textured finish scatters the beam so the wash looks grainy. The design must therefore control three variables: the distance from the strip to the ceiling, the depth of the cove lip, and the diffusion of the source. A shallow gap gives light almost no room to spread before it hits plaster, so every bump prints as a bright band or dots, while a deeper gap lets the beam average out small irregularities.
Reading Your Ceiling: Mapping Dips, Slopes, and High Spots Before You Build
Map the ceiling rather than assuming it. Hold a long straightedge or taut string against the ceiling along each wall where a cove will run, and mark where the surface rises or falls. A laser level projected onto the wall shows the same story faster, since the beam wanders wherever the ceiling is out of true. Record the largest deviation along each run, because the worst dip, not the average, sets your cove dimensions.
- Marking trick: Measure down from the ceiling at several points per wall, rather than trusting a spirit level, so the cove follows the ceiling’s own line.
- Access check: Note every joist, pipe, and cable in the void before fixing anything, and locate all future access points, since they decide where drivers will live.
Cove Shapes That Forgive an Uneven Ceiling
The right cove profile is the one whose lip stays parallel to the ceiling along the whole run while still hiding the strip from every normal viewing angle.
Stepped Cove Ledges for Ceilings That Rise and Fall
A stepped cove uses two or three short ledge sections at slightly different heights, following the ceiling’s major changes instead of bridging them with one long level line. Each step keeps a consistent gap to the ceiling above it, so the wash stays even, and the steps read as an intentional architectural detail.
Floating Shelf Coves That Sit Proud of a Bumpy Wall
A floating shelf cove is a slim timber or MDF shelf fixed to the wall with a small shadow gap behind it. Because it is a separate piece, it can be packed out from an uneven wall without disturbing the ceiling line, and the gap behind it hides wiring neatly.
Crown Molding Coves for Traditional Rooms
A crown molding cove uses a deep, downward-lipped molding to hide the strip and suits period interiors, but it is the least forgiving profile on an uneven ceiling: rigid molding fixed level will open up a visibly uneven gap wherever the ceiling dips. If you choose it, scribe the top edge to the ceiling’s profile.
Sizing the Gap: Throw Distance, Lip Height, and Setback for a Smooth Wash
Three dimensions decide whether the wash looks smooth or striped: the throw distance (vertical gap from cove opening to ceiling), the lip height (how tall the front edge is), and the setback (how far behind the lip the strip sits). As a starting point, many installers work with a throw of around four to six inches, a pocket depth of roughly two and a half to three inches, and the strip set back a further inch and a half to two inches behind the lip. On an uneven ceiling, err toward the deeper end of each range. Where the ceiling is very uneven, add a diffuser: a strip inside a frosted aluminum channel spreads each LED point into a continuous line before light reaches the plaster.
| Cove dimension | Tighter setting | Risk on an uneven ceiling |
| Throw distance | Under 4 inches | Bright bands and dots where the ceiling dips |
| Lip height | Under 2 inches | LEDs visible from normal sightlines |
| Strip setback | Flush with the lip | Hard bright edge at the cove opening |
| Diffuser | Bare strip | LED dots printed onto textured plaster |
Choosing LED Tape for a Bumpy Reflecting Surface
On a smooth ceiling almost any decent strip looks fine; on a bumpy one, the strip specification does real work. Continuous COB (chip-on-board) tape produces an unbroken line of light with no individual points, the single most effective upgrade for textured or uneven ceilings. If COB tape is unavailable, choose a high-density strip, typically 120 LEDs per metre or more, always paired with a frosted diffuser channel. Color quality matters more here too: a CRI of 90 or above keeps colors natural in reflected light. For living rooms and bedrooms, warm white of 2700K to 3000K is the usual choice.
- Voltage: 24V tape for runs longer than about five metres, to avoid dimming at the far end from voltage drop.
- Driver headroom: A driver rated at least 20 to 30 percent above the strip’s total wattage, so it runs cool and lasts longer.
- Batch: One production batch per run, since mismatched batches can show a visible color step where two reels join.
Power and Control When You Cannot Reach the Fixture Later
Limited fixture access changes the electrical plan more than the carpentry. Drivers fail far more often than LED tape, and a driver buried behind a sealed ceiling turns a ten-minute swap into a plaster repair. Every driver should sit in a ventilated, reachable spot: above a removable access panel, inside a nearby cupboard, or at the end of a cove run behind a lift-out section of molding. The same applies to controllers and dimmers, which should be reachable without damaging finishes.
Plan dimming before the ceiling closes: a dimmable driver, correctly sized cable, and a control wire to the switch are cheap at first fix and expensive afterward. Give the cove its own dimmable circuit rather than sharing a dimmer with downlights, since mixed loads commonly cause flicker.
A Room-by-Room Sequence for Installing Cove Lighting Over Uneven Plaster
Work in this order and the uneven ceiling stops causing rework. Each step assumes the previous one is finished, so resist fixing the cove before the ceiling has been mapped.
Map the ceiling along every cove run and choose the cove profile and gap dimensions from the worst deviation, not the average.
Mark the cove line by measuring down from the ceiling at multiple points and joining the marks, so the cove tracks the ceiling.
Fix battens or shelf brackets into studs or solid masonry, packing out behind them where the wall is uneven.
Run cables and position drivers in their accessible homes, leaving slack at every joint so a driver can be pulled out.
Mount the LED channel, test the full run at full brightness and dimmed, and check the wash from every seat and doorway.
Fit the lip or molding, then re-check the wash at night, when the cove is the room’s main light and flaws show most.
Caulk and paint the cove to match the ceiling, using a matte finish on the reflector surface so the wash stays soft.
What a Cove Lighting Project Like This Typically Runs
Costs vary with room size, cove profile, and whether an electrician is involved, so treat these figures as planning estimates rather than quotes. The biggest cost drivers on an uneven ceiling are extra carpentry for stepped or scribed profiles and any plaster preparation, such as a skim coat over heavy texture. Get at least two itemized quotes, and ask each installer how they will handle the ceiling’s uneven sections specifically: a quote priced as if the ceiling were flat is a warning sign.
| Cost element | Typical planning estimate |
| LED tape and diffuser channel, per metre | £8 to £25 (estimate) |
| Driver, dimmer, and controls, per run | £40 to £150 (estimate) |
| Shelf or molding cove materials, per metre | £10 to £40 (estimate) |
| Electrician, first fix and connection | £150 to £400 per room (estimate) |
| Plaster skimming over heavy texture, per room | £300 to £800 (estimate) |
Why Cove Washes Go Patchy: Diagnosing Dots, Bands, and Scallops
When the finished wash disappoints, the pattern itself points to the cause. Individual bright dots mean the source is too visible: the strip is too close to the ceiling, too low-density, or missing its diffuser. A continuous bright band near the cove edge usually means the strip sits too close to the lip or local output is too high. Repeated scallops, a wavy light-and-dark rhythm, point to beam overlap problems or a cove that changes depth mid-run. Dark gaps at joints are almost always connector issues, and over-bright corners come from strips overlapping where two runs meet. Fix the cause, not the symptom: adding a diffuser or increasing the throw distance removes dots while keeping the light level.
| What you see | Check first |
| Individual dots | LED density, diffuser depth, ceiling distance |
| Bright band near the edge | Strip position, mounting angle, output level |
| Repeated scallops | Beam overlap, setback consistency, depth changes |
| Dark gaps at joints | Cut points, connector length, section spacing |
| Over-bright corners | Overlapping strips, reflective surfaces |
Knowing When an Uneven Ceiling Calls for a Lighting Pro or Plasterer
Most shelf coves are realistic DIY work, but three situations argue for professional help. First, any new circuit, consumer unit work, or wiring in a bathroom or kitchen should be done by a qualified electrician, and local electrical safety rules apply even to low-voltage systems at the mains side of the driver. Second, a ceiling that is sagging, cracked, or shedding plaster may have a structural or water problem that lighting will only decorate, so get it assessed before building anything onto it. Third, a ceiling with deep waves, sometimes 25 millimetres or more out of true, may need plaster leveling before any cove can look right. Be cautious with older properties too: ceilings installed before the 1980s can contain asbestos in textured coatings, so have the coating tested and handled by a licensed contractor if its age is uncertain.
Final Thoughts: Should Indirect Cove Lighting Suit Your Uneven Ceiling?
Indirect cove lighting suits an uneven ceiling when the design respects the ceiling instead of pretending it is flat: a cove that tracks the ceiling’s line, a deep enough throw and a diffuser to blend the beam, and drivers placed where they can be reached. If the ceiling is only mildly wavy, a shelf cove with COB tape and a frosted channel will usually deliver a smooth wash; if it is deeply uneven or suspect, sort the plaster first. Start by mapping your ceiling, then choose the profile that fits what you measured.
Indirect Cove Lighting Questions for Uneven Ceilings and Tight Access
Can cove lighting work on a ceiling that is visibly out of level?
Yes, provided the cove follows the ceiling’s own line rather than a spirit level. Measure down from the ceiling at several points, join those marks, and let the cove track them. Stepped profiles handle larger changes, and a deeper throw distance helps the wash average out smaller waves.
How far below the ceiling should an indirect cove sit?
A throw distance of around four to six inches is a reliable starting point, with deeper gaps giving a smoother wash on uneven surfaces. The lip should hide the strip from every normal viewpoint, and the strip should sit roughly one and a half to two inches back from the lip.
Why does my cove lighting show dots on a textured ceiling?
Dots appear when individual LEDs are visible to the reflecting surface: the strip is too close, too low-density, or missing a diffuser. Switch to COB tape or a high-density strip in a frosted aluminum channel, and increase the distance to the ceiling where possible.
Where should the LED driver go when there is no access above the ceiling?
In a ventilated, reachable spot: behind a lift-out cove section, inside a nearby cupboard, or above a removable access panel. Never seal a driver behind fixed plaster, since drivers are the component most likely to need replacement.
Will cove lighting alone light a whole room?
It can provide the room’s ambient layer, but it rarely replaces task lighting. Pair the cove with reading lamps, kitchen task lights, or downlights where detailed work happens, and put the cove on its own dimmer so it can be balanced against them.
About the Author